[WordPress]詳細ページ不要
functions.php
add_filter('カスタム投稿タイプ_rewrite_rules','__return_empty_array');
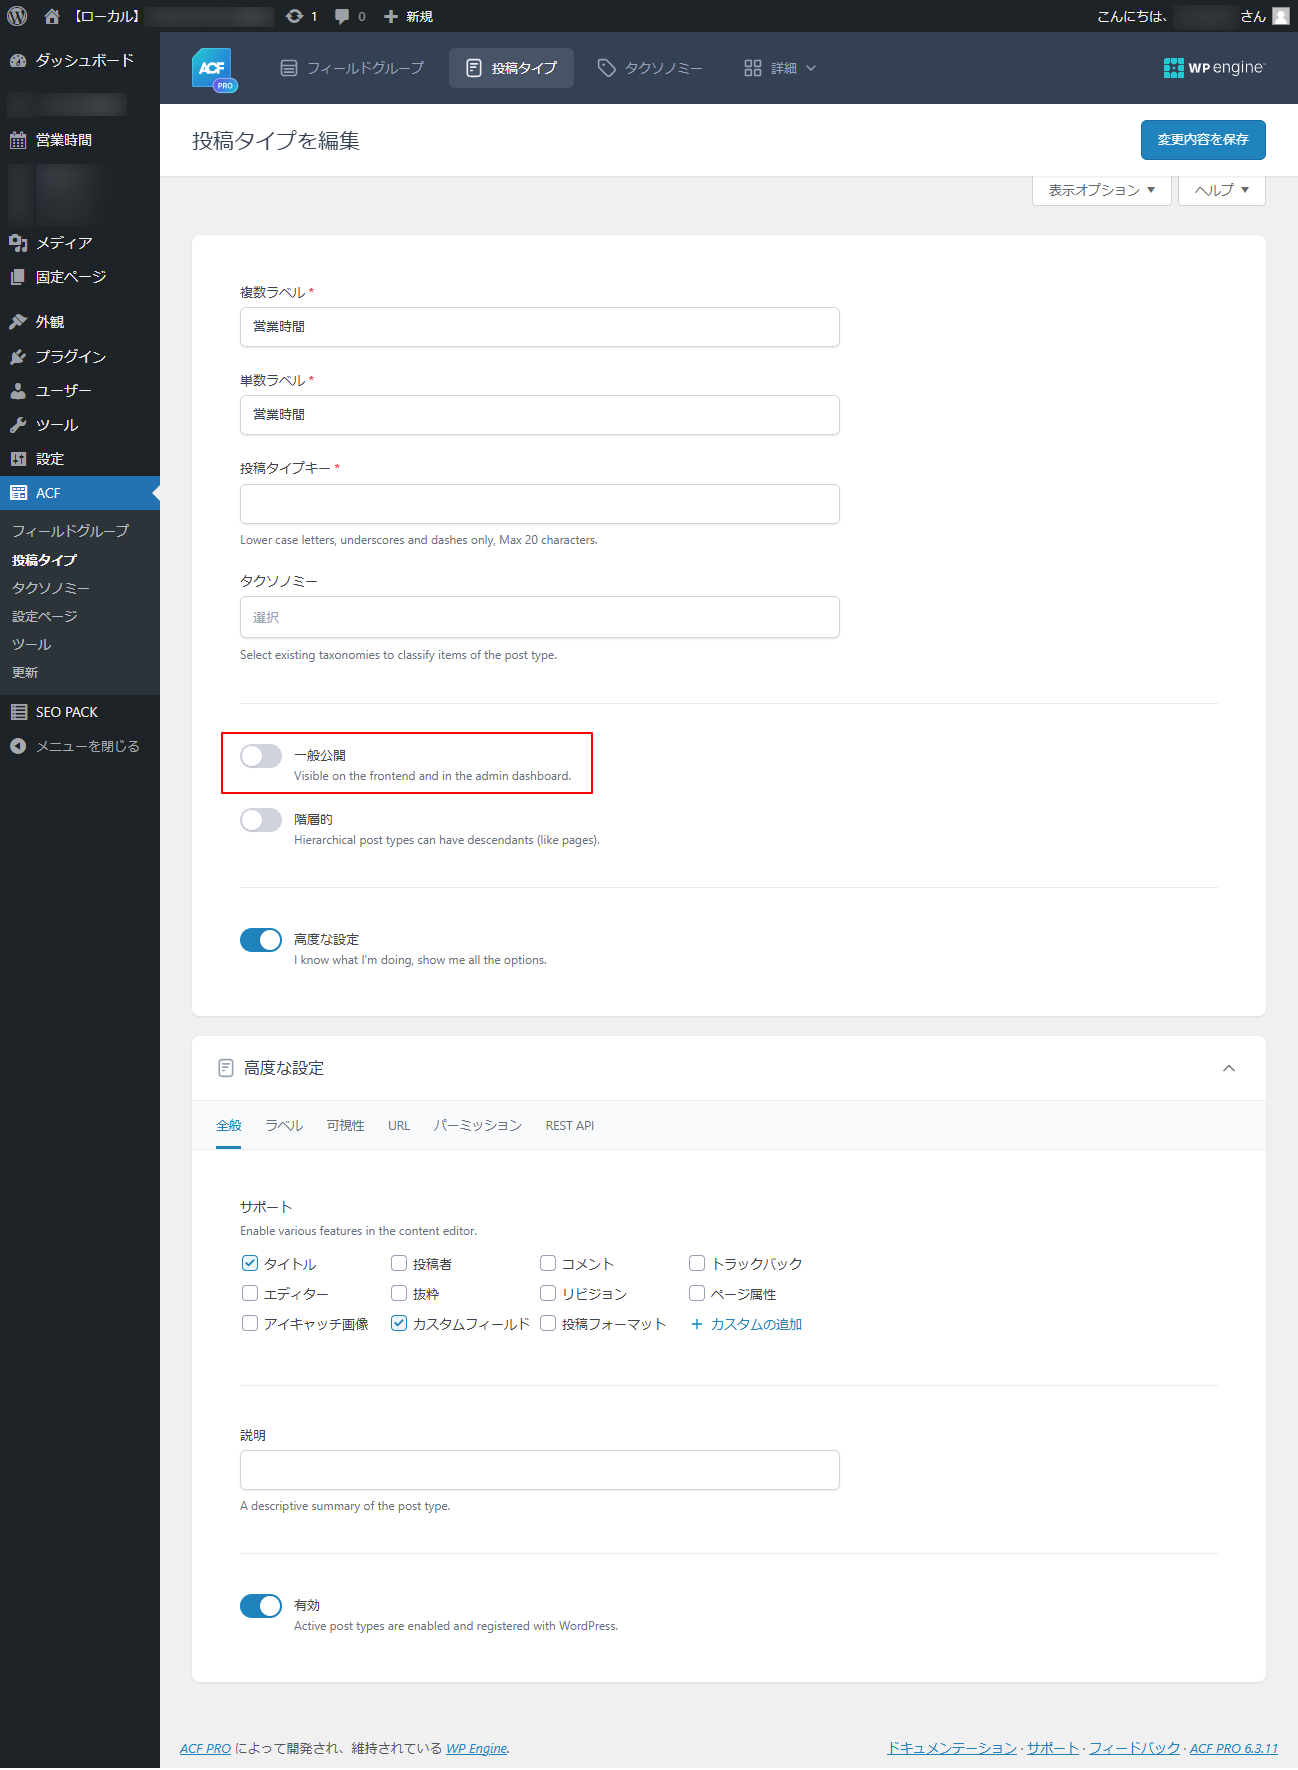
ACF Proの場合
下図赤枠をOFF

functions.php
add_filter('カスタム投稿タイプ_rewrite_rules','__return_empty_array');
ACF Proの場合
下図赤枠をOFF
npm
npm install tailwindcss @tailwindcss/vite
vite.config.ts
import { defineConfig } from 'vite'
import tailwindcss from '@tailwindcss/vite'
export default defineConfig({
  plugins: [
    tailwindcss(),
  ],
})
CSS
@import "tailwindcss";
下記は3系で動く
npx tailwindcss init -p
4系で上記を実行すると下記エラーが出る
npm error could not determine executable to run
https://tailwindcss.com/docs/installation/using-vite
cheatsheet
https://www.creative-tim.com/twcomponents/cheatsheet/
vite.config.tsのdefineConfigに下記追記
build: {
  outDir: 'build', // 出力先を 'build' フォルダに変更
},
create-react-app is deprecated.
代わりに下記
npm create vite@latest my-app --template react-ts
npm i is-odd
npm i --save-dev @types/is-odd
ts
import isOdd from "is-odd";
console.log(isOdd(2));
console.log(isOdd(3));
出力
false
true
npm i lodash
npm i --save-dev @types/lodash
ts
全部import
import _ from "lodash";

const list:number[] = [1,2,3,4,5];
const list2:number[] = _.shuffle(list);
console.log(list2);
一部import
import {shuffle} from "lodash";

const list:number[] = [1,2,3,4,5];
const list2:number[] = shuffle(list);
console.log(list2);
class Person {
  @accessor
  name: string;

  constructor(name: string) {
    this.name = name;
  }
}

const person = new Person("John");
console.log(person.name); // John
person.name = "Jeff";
console.log(person.name); // Jeff
バリデーション付き Auto-Accessor
function MinLength(length: number) {
  return (target: any, context: ClassAccessorDecoratorContext) => {
    return {
      set(value: string) {
        if (value.length < length) {
          throw new Error(`Value must be at least ${length} characters long.`);
        }
        return value;
      }
    };
  };
}

class User {
  @accessor @MinLength(3)
  username: string;

  constructor(username: string) {
    this.username = username;
  }
}

const user = new User("John");
console.log(user.username); // John

user.username = "Bob"; // OK
// user.username = "Al"; // エラー: Value must be at least 3 characters long.
ログ出力付き Auto-Accessor
function LogAccessor(target: any, context: ClassAccessorDecoratorContext) {
  return {
    get(value: any) {
      console.log(`Getting value: ${value}`);
      return value;
    },
    set(value: any) {
      console.log(`Setting value to: ${value}`);
      return value;
    }
  };
}

class Product {
  @accessor @LogAccessor
  price: number;

  constructor(price: number) {
    this.price = price;
  }
}

const product = new Product(1000);
console.log(product.price); // Getting value: 1000, 1000

product.price = 1500; // Setting value to: 1500
console.log(product.price); // Getting value: 1500, 1500
class Article{
    accessor title:string = "";
}
上記は下記と同じこと
class Article{
    #title:string = "";
    get title():string{
        return this.#title;
    }
    set title(value:string){
        this.#title = value;
    }
}
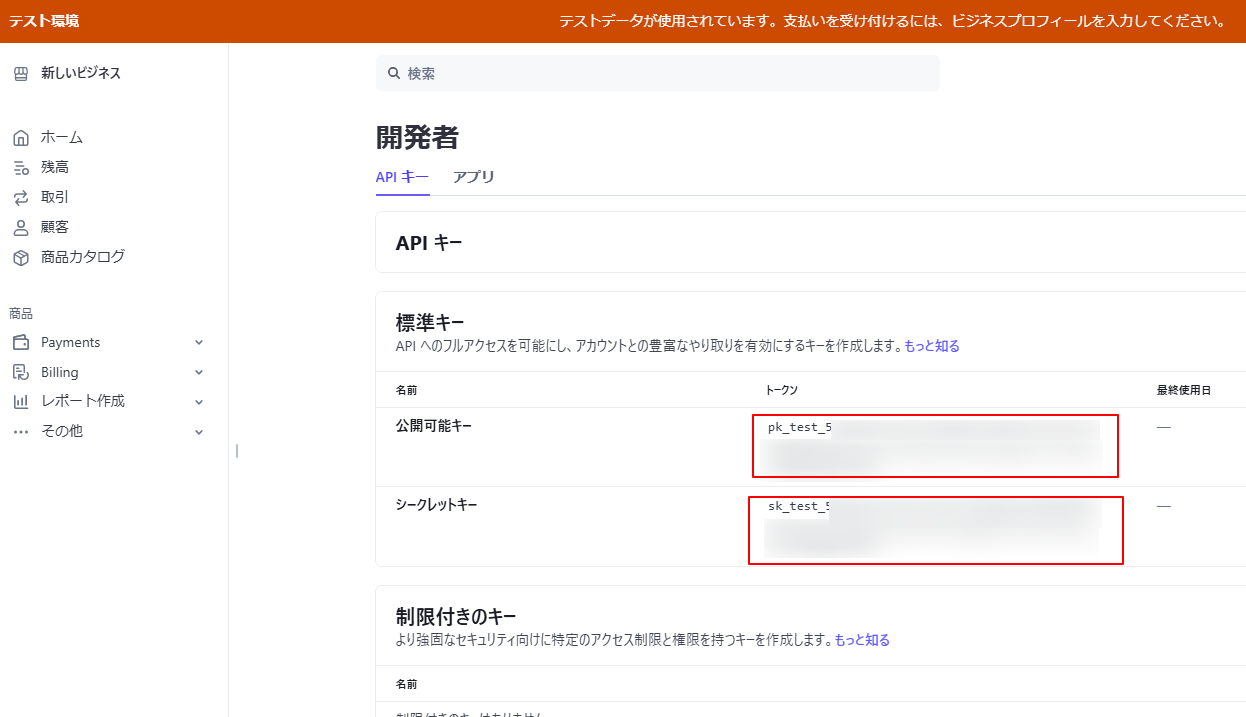
chashierインストール
sail composer require laravel/cashier
.envに下記追記
STRIPE_KEY="公開可能キー"
STRIPE_SECRET="シークレットキー"
キーは下図赤枠に記載されている
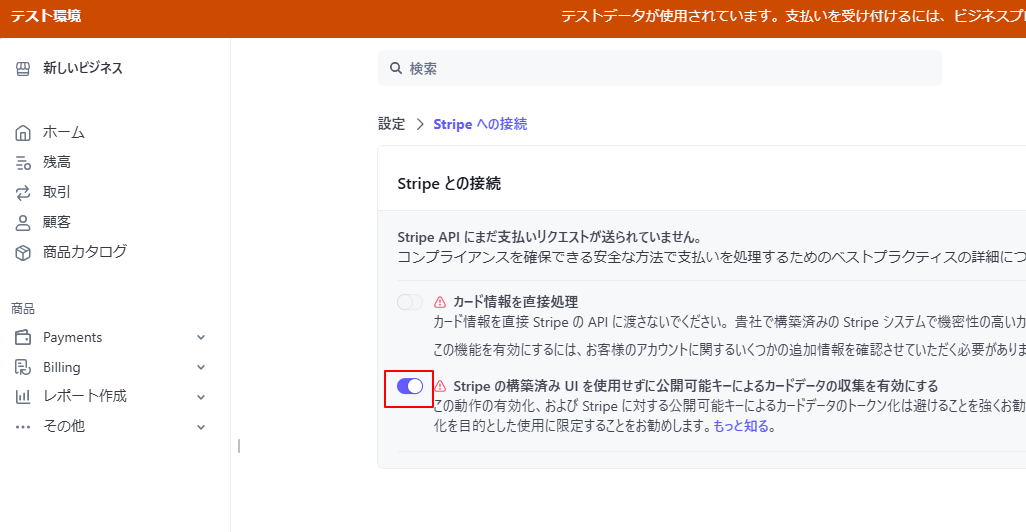
下図の赤枠をオンにしておく
StripeController作成
sail artisan make:controller StripeController
下記追記
use Stripe\Stripe;
use Stripe\Charge;

class StripeController extends Controller
{
    public function list()
    {
        return view('stripe.index');
    }

    public function charge(Request $request)
    {
        Stripe::setApiKey(env('STRIPE_SECRET'));
        $charge = Charge::create([
            'amount'   => 1000,
            'currency' => 'jpy',
            'source'   => request()->stripeToken,
        ]);
        return back();
    }
}
views/stripe/index.blade.phpを作成
<x-app-layout>
    <x-slot name="header">
        <h2 class="font-semibold text-xl text-gray-800 leading-tight">
            {{ __('Stripe一覧表示') }}
        </h2>
    </x-slot>

    <div class="mx-auto px-6">
        {{-- @if(session('message'))
            <div class="text-red-600 font-bold">{{session('message')}}</div>
        @endif --}}
        <x-message :message="session('message')" />
        <div class="mt-4 p-8 bg-white w-full rounded-2xl">
            <h1 class="p-4 text-lg font-semibold">テスト決済1000円</h1>
            <hr class="w-full">
            <form action="{{route('stripe.charge')}}" method="POST">
                @csrf
                <script
                src="https://checkout.stripe.com/checkout.js" class="stripe-button"
                data-key="{{ env('STRIPE_KEY') }}"
                data-amount="1000"
                data-name="お支払い画面"
                data-label="テスト決済する"
                data-description="現在はデモ画面です"
                data-image="https://stripe.com/img/documentation/checkout/marketplace.png"
                data-locale="auto"
                data-currency="JPY">
                </script>
            </form>
        </div>
    </div>
</x-app-layout>
routes/web.phpに下記追記
use App\Http\Controllers\StripeController;
Route::post('/stripe/charge', [StripeController::class,'charge'])->name('stripe.charge');
Route::get('/stripe', [StripeController::class,'list'])->name('stripe.index');
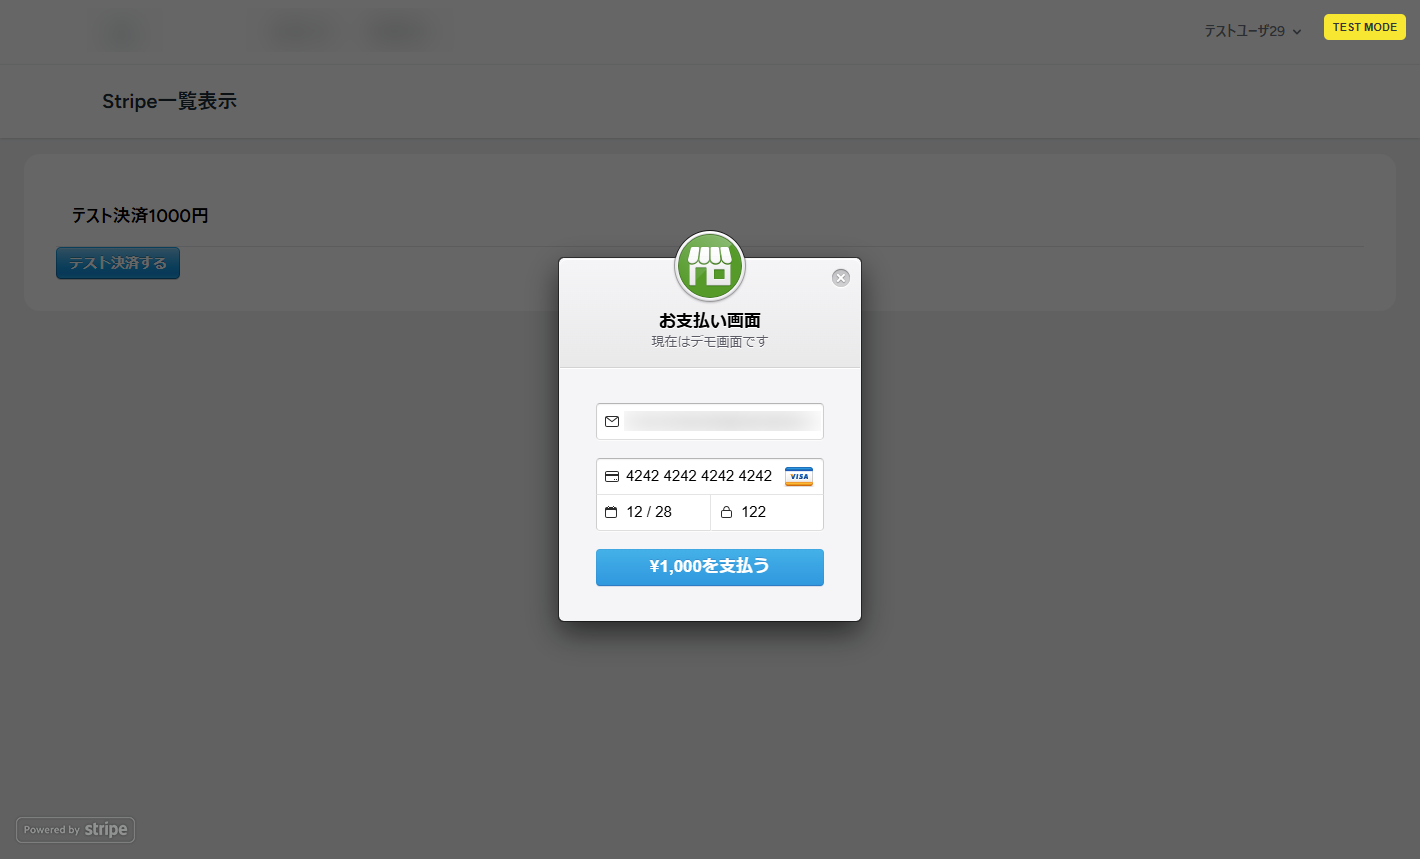
localhost/stripeにアクセス後「テスト決済する」押下して下記を入力
適当なメールアドレス
4242424242424242
適当な日付 3桁の数字
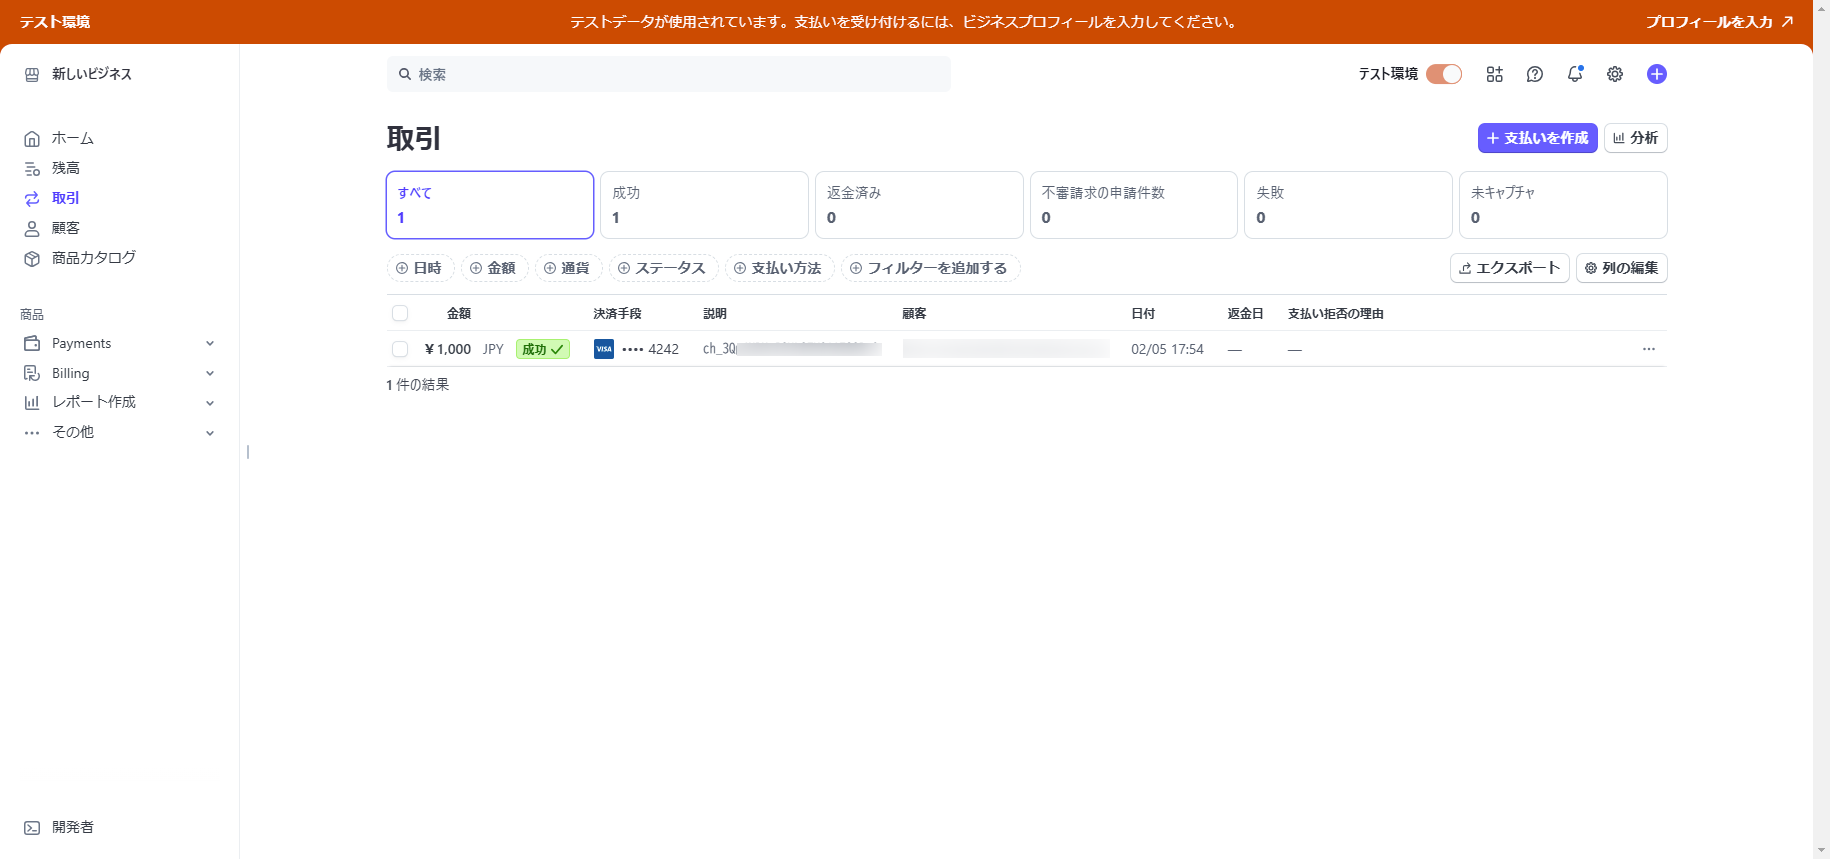
決済に成功するとダッシュボードで確認出来る
/*
デコレータファクトリ
言い換えると引数付デコレータ
*/
function logged(message = "[LOG]:"){
    return function actDeco(originalMethod:any,context:any){
        function loggedMethod(this:any,...args:any[]){
            console.log(`${message} ${context.name} start`);
            const result = originalMethod.call(this,...args);
            console.log(`${message} ${context.name} finish`);
        }
        return loggedMethod;
    };
}
function bound(_originalMethod:any,context:any){
    context.addInitializer(function(this:any){
        this[context.name] = this[context.name].bind(this);
    });
}

class Article{
    protected name:string;
    constructor(name:string){
        this.name = name;
    }
    @bound
    @logged("[Article]:")
    showData():void{
        console.log(this.name);
    }
}

const article = new Article("John Smith");
article.showData();
出力
[Article]: showData start
John Smith
[Article]: showData finish