[objective-c]EGODatabase #3 全テーブル名の取得

EGODatabase*db=[EGODatabase databaseWithPath:[NSHomeDirectory() stringByAppendingPathComponent:@"Documents/database.db"]];
NSString*sql=@"select name from sqlite_master where type = 'table' order by name";
EGODatabaseResult*result=[db executeQuery:sql];
if (result.errorCode) {//failed
    return;
}
NSMutableArray*list=[NSMutableArray arrayWithCapacity:[result count]];
for (EGODatabaseRow*row in result) {
    [list addObject:[row stringForColumn:@"name"]];
}

参考サイト
enormego/egodatabase · GitHub
https://github.com/enormego/egodatabase

[objective-c]UIImageを複製する

CGImageを使う方法

-(UIImage*)getCUIImage:(UIImage*)img{
    return [UIImage imageWithCGImage:[img CGImage]];
}

CGImageを使わない方法

-(UIImage*)getCopyUIImage:(UIImage*)imageToCopy{
    UIGraphicsBeginImageContext(imageToCopy.size);
    [imageToCopy drawInRect:CGRectMake(0, 0, imageToCopy.size.width, imageToCopy.size.height)];
    UIImage *copiedImage =UIGraphicsGetImageFromCurrentImageContext();
    UIGraphicsEndImageContext();  
    return copiedImage;
}

[objective-c]UIImageを2枚重ねた状態をUIImageにする

UIImageを2枚重ねた状態をUIImageにする

-(UIImage*)getWImage:(UIImage*)bottomImage frontImage:(UIImage*)frontImage{
    int width = bottomImage.size.width;
    int height = bottomImage.size.height;
    
    CGSize newSize = CGSizeMake(width, height);
    UIGraphicsBeginImageContextWithOptions(newSize, NO, 1.0);
    [bottomImage drawInRect:CGRectMake(0,0,newSize.width,newSize.height)];
    [frontImage drawInRect:CGRectMake(0,0,newSize.width,newSize.height) blendMode:kCGBlendModeNormal alpha:1.0];
    
    UIImage *newImage = UIGraphicsGetImageFromCurrentImageContext();
    UIGraphicsEndImageContext();
    
    return newImage;
}

[objective-c]EGODatabase #1 テーブル作成

EGODatabaseはスレッドセーフなSQLiteのラッパーです。

-(EGODatabase*)getDB{
    EGODatabase* database = [EGODatabase databaseWithPath:[NSHomeDirectory() stringByAppendingPathComponent:@"Documents/database.db"]];
    return database;
}
EGODatabase* database=[self getDB];
NSString*sql=[NSString stringWithFormat:@"create table if not exists '%@' (id int,gno int,type int,filename varchar);",tableName];
EGODatabaseResult*result= [database executeQuery:sql];
if (result.errorCode) {//failed
        
}else{//success
        
}

参考サイト
enormego/egodatabase · GitHub
https://github.com/enormego/egodatabase

[objective-c]Documentsフォルダの指定ファイルを削除

-(void)removeFileByPath:(NSString*)path{
    NSFileManager *fm = [NSFileManager defaultManager];
    if (![fm fileExistsAtPath:path]) {
        NSLog(@"no file");
        return;
    }
    NSError *error=nil;
    [fm removeItemAtPath:path error:&error];
    if (error!=nil) {//failed
        NSLog(@"failed to remove %@",[error localizedDescription]);
    }else{
        NSLog(@"Successfully removed:%@",path);
    }
}
NSString* path=[NSHomeDirectory() stringByAppendingPathComponent:@"Documents"];
path=[path stringByAppendingPathComponent:@"test.png"];
[self removeFileByPath:path]; 

[objective-c]Documentsフォルダのファイル名一覧を出力

-(NSArray*)fileNames:(NSString*)fileName {
    NSString* path=[NSHomeDirectory() stringByAppendingPathComponent:@"Documents"];
    path=[path stringByAppendingPathComponent:fileName]; 
    return [[NSFileManager defaultManager] contentsOfDirectoryAtPath:path error:nil];
}
-(void)traceAllFiles{
    NSArray*t=[self fileNames:@""];
    NSLog(@"traceAllFiles %@",[t description]);
}
[self traceAllFiles];

[objective-c]UIImageをpng形式ファイルで保存

カメラロールにpngで保存

-(void)savePhotoPng:(UIImage*)orizinalSizeImage{
    NSData *imageData = UIImagePNGRepresentation(orizinalSizeImage);
    UIImage *pngimage = [UIImage imageWithData:imageData];
    UIImageWriteToSavedPhotosAlbum(pngimage, self, @selector(image:didFinishSavingWithError:contextInfo:), nil);
}

Documentsフォルダにファイルとして保存

-(NSString*)getPathByFileName:(NSString*)fileName{
    NSString* path=[NSHomeDirectory() stringByAppendingPathComponent:@"Documents"];
    return [path stringByAppendingPathComponent:fileName];
}
NSString*path=[self getPathByFileName:@"test.png"];
NSData*d=UIImagePNGRepresentation(uiimg);
if ([d writeToFile:path atomically:YES]) {
    NSLog(@"save OK - %@",path);
}else{
    NSLog(@"save NG - %@",path);
}

[iPhone Apps]タッチフィルター

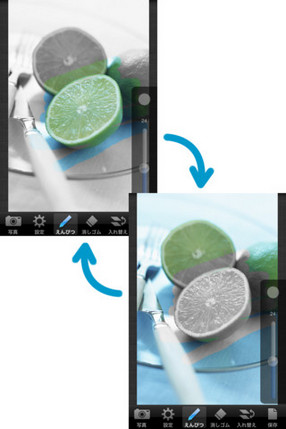
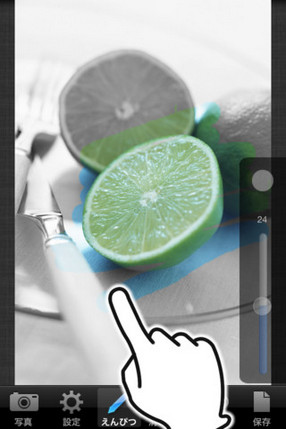
iPhoneアプリ「タッチフィルター」をリリースしました。
このアプリは諸事情によりスポットカラーフォトを改名したものです。
機能が1つ追加されていますが、ほぼ同じものです。

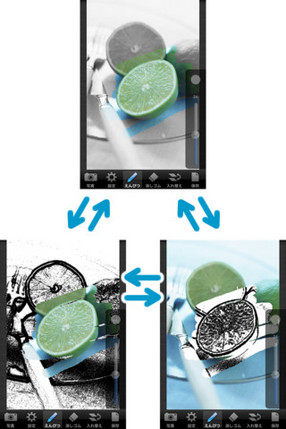
タッチフィルターはモノクロ写真を指でなぞった部分だけカラーにするアプリです。
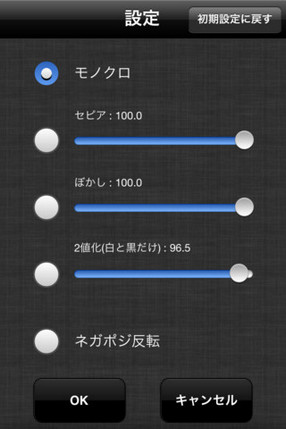
モノクロ以外にもセピアにしたり、ネガポジ反転したり出来ます。
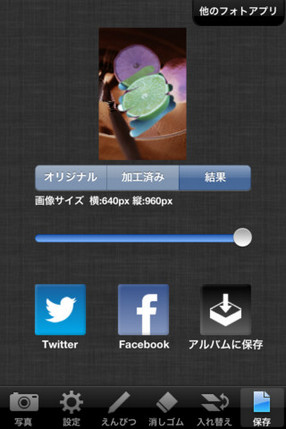
Twitter,Facebookに対応しており、作った写真をすぐにアップロードすることが出来ます。

主な機能
■撮った写真または保存されている写真を指でなぞった部分だけカラーにできます。
■写真をモノクロできます。
■写真をセピアにできます。
■写真をぼかすことができます。
■写真を2値化することができます。
■写真をネガポジ反転できます。
■写真をTwitterへアップロードできます。
■写真をFacebookへアップロードできます。
■写真を使用中のiPhone,iPodへ保存できます。

DrawFilter is photo retouch App.
If you touch the photo,touch area becomes color.
You can upload photos to Twitter,Facebook.

Features
■If you touch the photo,touch area becomes color.
■Enable to convert the photo to grayscale.
■Enable to convert the photo to sepia.
■Enable to convert the photo to blurring photo.
■Enable to convert the photo to 1bit photo.
■Enable to invert color of the photo.
■Enable to upload photo to Twitter.
■Enable to upload photo to Facebook.
■Enable to save photo to your device.

DrawFilter est retouche photo App.
Si vous touchez la photo, la zone tactile devient couleur.
Vous pouvez télécharger des photos vers Twitter, Facebook.

traits
■ Si vous touchez la photo, la zone tactile devient couleur.
■ Permettre à convertir la photo en niveaux de gris.
■ Permettre à convertir la photo en sépia.
■ Permettre à convertir la photo à brouiller photo.
■ Permettre de convertir la photo pour photo 1bit.
■ Activer pour inverser la couleur de la photo.
■ Permettre à charger une photo sur Twitter.
■ Permettre à charger une photo sur Facebook.
■ Activer pour sauvegarder la photo sur votre appareil.

绘制过滤是照片润饰应用。
如果你接触的照片,触摸区变成了颜色。
你可以上传照片到Twitter,Facebook的。

特点
■如果你接触的照片,触摸区变成了颜色。
■启用转换为灰度的照片。
■启用照片转换为褐色。
■启用转换的照片模糊的照片。
■启用转换1位照片的照片。
■启用翻转照片的颜色。
■启用上传照片到Twitter。
■启用上传照片到Facebook。
■启用照片保存到您的设备。

タッチフィルター
タッチフィルター

DrawFilter(English)
DrawFilter(French)
绘制过滤
タッチフィルタータッチフィルター

タッチフィルタータッチフィルター

タッチフィルター

[PHP]wordpressでサイト構築Tips

wordpress3.0からマルチサイト機能がある。
これを使うとhttp://yourdomain/とhttp://yourdomain/A/とhttp://yourdomain/B/で
違うブログを表示できる。
・http://yourdomain/A/にアクセスしたときもhttp://yourdomain/B/にアクセスしたときも
 http://yourdomain/index.phpが呼ばれている。
・http://yourdomain/wordpress/にwordpressをインストールして、
 トップページをhttp://yourdomain/にする設定では
 マルチサイト機能が使えない。http://yourdomain/にインストールすれば出来る。

参考サイト
WordPressのマルチサイト機能で複数のブログを管理する
http://mage8.com/multiple-blogs-on-wordpress.html

マルチサイト機能使用時のindex.phpのサンプル

index.php
<?php
$req=$_SERVER['REQUEST_URI'];
$n=explode('?',$req);
$req=$n[0];

if($req=='/'){
	//普通にテンプレートを使って表示
	define('WP_USE_THEMES', true);
	require('./wp-blog-header.php');
}else if($req=='/A/'){
	define('WP_USE_THEMES', false);
	require('./wp-blog-header2.php');
	include('include_A.php');
}else if($req=='/B/'){
	define('WP_USE_THEMES', false);
	require('./wp-blog-header2.php');
	include('include_B.php');
}
?>
wp-blog-header2.php
<?php
if ( !isset($wp_did_header) ) {
	$wp_did_header = true;
	require_once( dirname(__FILE__) . '/wp-load.php' );
	wp();
}
?>

よく使いそうなメソッド

全ブログのIDを取得
$blogs=get_blog_list(0,'all');
foreach($blogs as $blog){
	echo $blog['blog_id'];
}

カテゴリー一覧を取得
$categories = get_categories();
foreach($categories as $cat){
	echo $cat->cat_ID;
}

指定したカテゴリIDから記事を取得
<ul>
<?php
	query_posts('showposts=3&cat='.$category->cat_ID);
	if (have_posts()) : while (have_posts()) : the_post();
?>
<li>
	<?php
		the_ID();
		echo '<br/>';
		the_title();
		echo '<br/>';
		the_content();
	?>
</li>
<?php endwhile; endif; ?>
</ul>

記事の内容を取得
$c=get_the_content();

参考サイト

関数リファレンス – WordPress Codex 日本語版
http://wpdocs.sourceforge.jp/%E9%96%A2%E6%95%B0%E3%83%AA%E3%83%95%E3%82%A1%E3%83%AC%E3%83%B3%E3%82%B9

管理画面で各ブログのIDを表示するプラグイン

View Blog ID in WordPress Multisite – WP Engineer

View Blog ID in WordPress Multisite